Hosting comments within issues on Github Pages
Note: As of February 2018, the repo for this website is public, so I moved the comments to the same repo instead of using a separate project for them.
When I created a blog to have a place to write and document things, as well as complete a class requirement for CS 404, there were properties that I wanted it to have. I wanted it to be simple, to be hosted on a reputable platform, to be under my control, and to perform well. By using Github Pages to host a run a Jekyll static site, I was pretty much able to get everything in one fell swoop.
However, one thing I found lacking was comments or giving anyone a way to respond or comment on a given blog post. I looked around for a few different solutions. One option that many turn to is using Disqus comments. It is easy to implement, requiring a simple snippet of Javascript to be included on any post where you would like comments to be included, but several drawbacks of using Disqus quickly became apparent. As an additional Javascript component, it requires additional requests that can quickly bog down what was once a quick, simple website. 1 Other issues of privacy and security also came up with Disqus, and any third party service you trust is just another liability for your website. 2 Other products I looked at were Discourse and Poole, but I really wanted to avoid making the site any more complicated and having to rely on a third party.
I found a blog post by Ivan Zuzak that detailed how you can utilize Github’s Issue Tracking system to host the comments for a Github Pages site. 3 It is a really nifty hack that adds comments hosted via the same platform that the site is hosted one, with only a couple steps added to my workflow when posting.
I followed Ivan’s steps, with a small change to his instructions for my own situation. The reason for the change is that I host my site in a private Github repository, and I didn’t want to make it public. The fix was to simply use a second, public repo for the comments while I continue to keep the website in the private repo. Aside from that, everything worked perfectly. The following steps (which are further explained in Ivan’s blog post) set the system in place:
Adding the foundation to your site
1. (Optional) Create a public repository where you can create issues to host the comments. If the repo where your site is hosted is private, then the issues will be private as well. Even if the website has authorization to pull the comments for public viewing, no one would be able to submit new comments via Github without being explicitly granted access to at least view the repo. My work around is creating a second public repo to store my comments. If your Github Pages site is already in a public repo, then you can simply use the repo’s issue for comments.
2. Register a New OAuth Application with GitHub. Give it a name that you will remember it by (doesn’t really matter for our purposes). The Homepage and Authorization callback URLs should both be the URL of your blog. For example, mine are set to http://seanlane.net, which can be in seen in the following image:
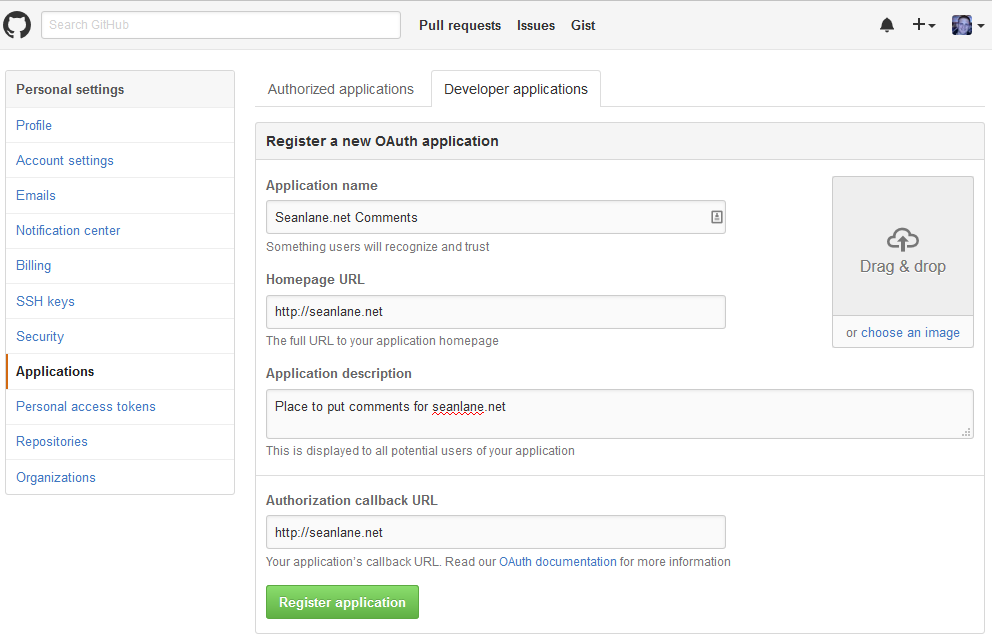
Adding a new OAUTH Application in Github
This authorizes the site to by-pass the Same-Origin policy, which is further explained in Ivan’s piece 4.
3. I added the following code to the Jekyll template for each post:
{% if page.commentIssueId %}
  <div id="comments">
    <h2>Comments</h2>
    <div id="header">
        Want to leave a comment? Visit <a href="https://github.com/seanlane/seanlane-comments/issues/{{page.commentIssueId}}">
        this post's issue page on GitHub</a> (you'll need a GitHub account. What? Like you already don't have one? :).
    <div>
  </div>
  <script type="text/javascript" src="http://ajax.googleapis.com/ajax/libs/jquery/1/jquery.min.js"></script>
  <script type="text/javascript" src="http://datejs.googlecode.com/svn/trunk/build/date-en-US.js"></script>
  <script type="text/javascript">

      function loadComments(data) {
          for (var i=0; i < data.length; i++) {
              var cuser = data[i].user.login;
              var cuserlink = "https://www.github.com/" + data[i].user.login;
              var clink = "https://github.com/seanlane/seanlane-comments/issues/{{page.commentIssueId}}#issuecomment-" +
                  data[i].url.substring(data[i].url.lastIndexOf("/") + 1);
              var cbody = data[i].body_html;
              var cavatarlink = data[i].user.avatar_url;
              var cdate = Date.parse(data[i].created_at).toString("yyyy-MM-dd HH:mm:ss");

              $("#comments").append("<div class='comment'><div class='commentheader'><div class='commentgravatar'>"
                  + '<img src="' + cavatarlink + '" alt="" width="20" height="20">'
                  + "</div><a class='commentuser' href=\"" + cuserlink + "\">"
                  + cuser + "</a><a class='commentdate' href=\"" + clink
                  + "\">" + cdate + "</a></div><div class='commentbody'>" + cbody + "</div></div>");
          }
      }

      $.ajax("https://api.github.com/repos/seanlane/seanlane-comments/issues/{{page.commentIssueId}}/comments", {
          headers: {Accept: "application/vnd.github.full+json"},
          success: function(msg){
              loadComments(msg);
          }
      });
  </script>
{% endif %}
This checks to see if the post has an Issue ID (which will be set in a following step) from which to gather comments, and then populates the bottom of the page with them.
4. To make the comments a little easier on the eyes, I added some CSS to my templates main CSS file as well:
/********************************
*
*  COMMENTS
*
********************************/


.comment {
    background-color: transparent;
    border-color: #CACACA;
    border-style: solid;
    border-width: 1px;
    color: black;
    display: block;
    margin-bottom: 10px;
    margin-top: 10px;
    padding: 0px;
    width: 100%;
  }

.comment .commentheader {
  border-bottom-color: #CACACA;
  border-bottom-style: solid;
  border-bottom-width: 1px;
  color: black;
  background-image: -webkit-linear-gradient(#F8F8F8,#E1E1E1);
  background-image: -moz-linear-gradient(#F8F8F8,#E1E1E1);
  color: black;
  display: block;
  float: left;
  font-family: helvetica, arial, freesans, clean, sans-serif;
  font-size: 12px;
  font-style: normal;
  font-variant: normal;
  font-weight: normal;
  height: 33px;
  line-height: 33px;
  margin: 0px;
  overflow-x: hidden;
  overflow-y: hidden;
  padding: 0px;
  text-overflow: ellipsis;
  text-shadow: rgba(255, 255, 255, 0.699219) 1px 1px 0px;
  white-space: nowrap;
  width: 100%;
}

.comment .commentheader .commentgravatar {
  background-attachment: scroll;
  background-clip: border-box;
  background-color: white;
  background-image: none;
  background-origin: padding-box;
  border-color: #C8C8C8;
  border-style: solid;
  border-width: 1px;
  color: black;
  display: inline-block;
  float: none;
  font-family: helvetica, arial, freesans, clean, sans-serif;
  font-size: 1px;
  font-style: normal;
  font-variant: normal;
  font-weight: normal;
  height: 20px;
  line-height: 1px;
  margin-left: 5px;
  margin-right: 3px;
  margin-top: -2px;
  overflow-x: visible;
  overflow-y: visible;
  padding: 1px;
  text-overflow: clip;
  text-shadow: rgba(255, 255, 255, 0.699219) 1px 1px 0px;
  vertical-align: middle;
  white-space: nowrap;
  width: 20px;
}

.comment .commentheader a:link {
  text-decoration: none;
}

.comment .commentheader a:hover {
  border-bottom:1px solid;
}


.comment .commentheader .commentuser {
  background-color: transparent;
  color: black;
  display: inline;
  float: none;
  font-family: helvetica, arial, freesans, clean, sans-serif;
  font-size: 12px;
  font-style: normal;
  font-variant: normal;
  font-weight: bold;
  height: 0px;
  line-height: 16px;
  margin-left: 5px;
  margin-right: 10px;
  overflow-x: visible;
  overflow-y: visible;
  padding: 0px;
  text-overflow: clip;
  text-shadow: rgba(255, 255, 255, 0.699219) 1px 1px 0px;
  white-space: nowrap;
  width: 0px;
}

.comment .commentheader .commentdate {
  background-color: transparent;
  color: #777;
  display: inline;
  float: none;
  font-family: helvetica, arial, freesans, clean, sans-serif;
  font-size: 11px;
  font-style: normal;
  font-variant: normal;
  font-weight: normal;
  height: 0px;
  line-height: 33px;
  margin: 0px;
  overflow-x: visible;
  overflow-y: visible;
  padding: 0px;
  text-overflow: clip;
  text-shadow: rgba(255, 255, 255, 0.699219) 1px 1px 0px;
  white-space: nowrap;
  width: 20em;
}

.comment .commentbody {
  background-attachment: scroll;
  background-clip: border-box;
  background-color: transparent;
  background-image: none;
  background-origin: padding-box;
  color: #333;
  display: block;
  margin-bottom: 1em;
  margin-left: 1em;
  margin-right: 1em;
  margin-top: 40px;
  overflow-x: visible;
  overflow-y: visible;
  padding: 0em;
  position: static;
  width: 96%;
  word-wrap: break-word;
}

.comment .commentbody p {
  margin-bottom: 0.5em;
  margin-top: 0.5em;
  margin-left: 0em;
  margin-right: 0em;
}

.comment .commentbody pre {
  border: 0px solid #ddd;
  background-color: #eef;
  padding: 0 .4em;
}

.comment .commentbody pre code {
  border: 0px solid #ddd;
}

.comment .commentbody code {
  border: 1px solid #ddd;
  background-color: #eef;
  font-size: 85%;
  padding: 0 .2em;
}
With those four steps, I can introduce comments on any given blog post (or any page with the support code in place). Again, note that most of the code came from Ivan Zuzak’s post, with some small modifications on my part.
Adding comments to a post
Now all that is left to do is perform the following steps for any post that you want to have comments. For each post, do the following:
1. Create a new issue in your designated repo to act as a host for your comments for that particular post. Every issue follows a base URL: https://github.com/{GITHUB USERNAME}/{REPO NAME}/issues/{ISSUE ID #}. Each issue is given a unique ID that is visible in the URL of the issue after it has been created. For example, https://github.com/seanlane/seanlane-comments/issues/1:
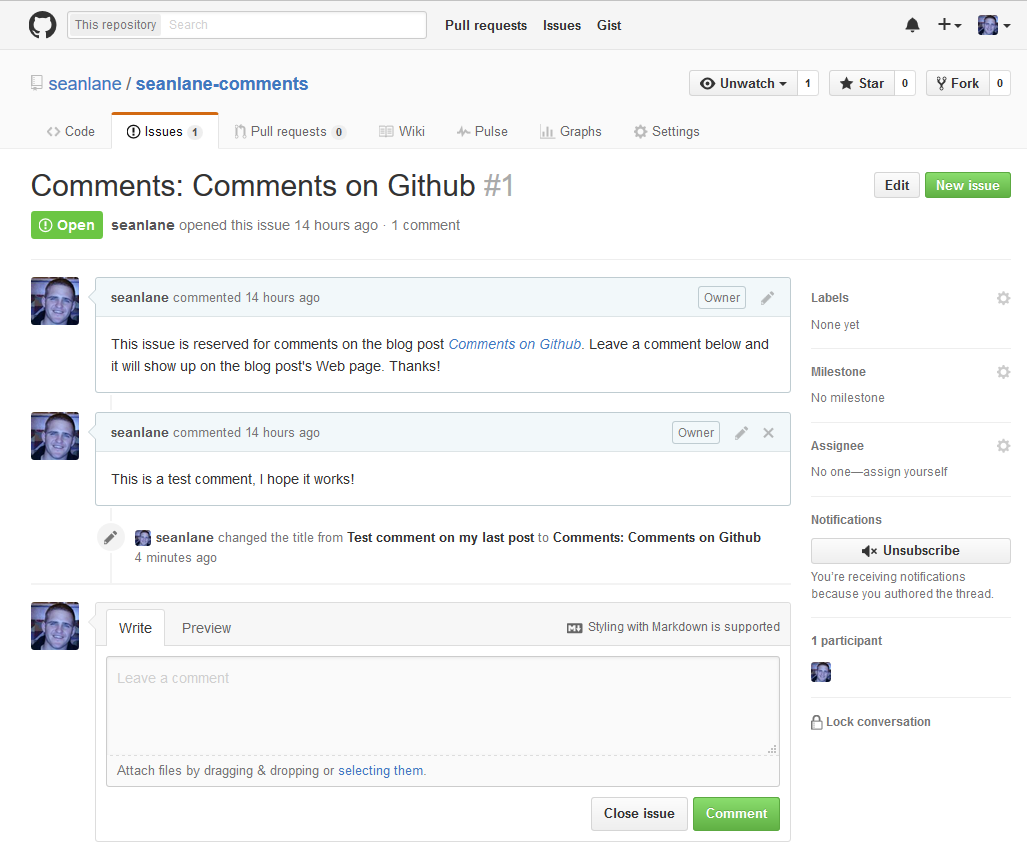
Screenshot of the Github issues page for this post's comments
2. Take the ID for that issue that will serve as the comments page for a particular post, and add the ID as a property in the page YAML front matter:
    ---
    layout: post
    title: Comments on Github
    commentIssueId: 1
    ---
When properly setup, we will then see an appropriate comments section after our blog post:
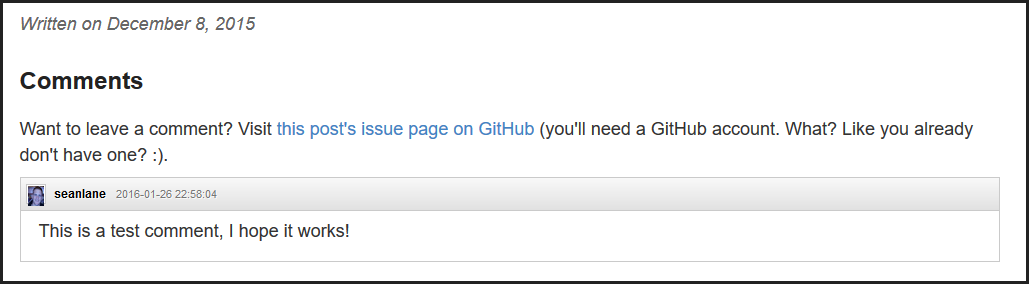
Screenshot of the Comments in action
It might be a slight hack, but now I have an easy way to pull comments into my static website without involving a third-party platform or forcing users to download yet another Javascript tracking widget. Hopefully, my example is of use to someone, and I appreciate Ivan’s post for leading the way.
Comments